ASSIGNMENT 2 & ASSIGNMENT 3
PREPARED BY :
NOOR HIDAYAH BINTI CHE LAH
MP101013
PREPARED FOR :
ASSOC. PROF.DR. ZAIDATUN TASIR
ASSIGNMENT 2
Digital Image Manipulation (6 Images)
Image 1
My picture
Tun Dr. Mahathir
Images 1 (techniques used)
§Crop
§Blur
§Combination
Steps :
1. Crop the picture of Tun Dr Mahathir using crop tool and select with magnetic lasso tool.
2. Combine the picture to my picture.
3. Crop the background picture.
4. Make the blur background using blur tool.
5. Save the file.
Result for Image 1
Image 2
Picture b
Picture c
Picture a
Picture c
Images 2 (techniques used)
§Crop
§Combination
§Superimpose
§Rotate
§Resize
Steps :
1. Resize picture c to be small than others pictures.
2. Crop pictures a and picture c using magnetic lass tool.
3. Combine the pictures that had been crop to picture b.
4. Duplicate layer for picture c that had been crop to get superimpose picture.
5. Rotate the duplicate layer using edit-rota canvas-flip canvas vertical.
6. Place the duplicate layer picture to the right position.
7. Save the file.
Result for Image 2
Image 3
Picture a
Picture b
Images 3 (techniques used)
§Resize picture
§Pattern
§Hue Saturation
Steps :
1. Resize the picture a to become small.
2. Define the pattern of picture b by using , open file-open picture b – select picture b-edit-define pattern-save the pattern.
3. Open the picture a, select area that want to be pattern using magnetic lasso tool.
4. Then, click select, modify, feather, choose radius.
5. Click to the select area, right click-fill-choose the pattern.
6. For huge saturation, click image-image adjustment-huge saturation. Choose the color that wanted.
7. Save the file.
Result for Image 3
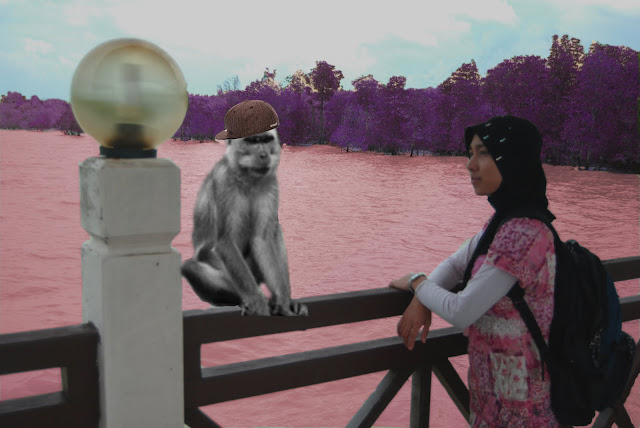
Image 4
Picture a
Picture b
Picture c
Images 4 (techniques used)
§Combination
§Hue saturation
§Crop
§Black and white
§Resize
Steps :
1. Resize picture c (cap) became smaller .
2. Crop picture b (monkey) and picture c (cap) using crop tool and edit the pictures using magnetic tool for better view.
3. Combine the picture b and c that have been crop at the pictures a.
4. Select the water using magnetic tools ,change the color using huge saturation. Select the tree using magnetic tool and edit color using huge saturation.
5. Select monkey, then edit the color of monkey to be black and white. To do this, click image-adjustment-black and white.
6. Save the file.
Result for Image 4

Image 5
Images 5 (techniques used)
§Black and white
§Crop
§Filter (liquify)
Steps :
1. Select the picture, change color of picture to be black and white. To do this, click image-adjustment-black and white.
2. Crop the right site of picture, filter it using liquify. Repeat the same thing for the left site of picture.
3. Save the file.
Result for Image 5
Image 6
Picture a
Images 5 (techniques used)
§Resize
§Combination
§Framing
§Crop
Steps :
1.Resize picture a to become smaller.
2.Crop picture a (subject need) using crop tool, select the subject using magnetic lasso tool.
3.Combine the picture a that had been crop to picture b.
4.Create framing at the pictures b. To do this, choose rectangle tool and put it as white color.Put it for the whole side of picture as a framing.
Result for Image 6
ASSIGNMENT 3
Graphic Design – Books Cover
Pictures used
Design of Book Cover
Description of Book Cover
§Size : 6 x 8 inch
§Title : Landscape Photography
§Background color : white
§Theme : Simple and just nice
Description of Text Used
§Typography : Trebuchet MS
§Font size : 36 ( LANDSCAPE) &
48 (PHOTOGRAPHY)
§Text color : Green
§Text effects : - drop shadow
- Outer glow
- bevel and emboss
- contour
- contour
Steps:
1.Edit picture which is to add lighting effect using filter-render
lighting effect.
2.Edit picture for add blur using blur tool.
3.Edit picture for crop using crop tool.
4.Resize all of the pictures. Edit-image size-resize the image.
5.Create a new layer and design the text. Double click to tex
layer –layer style-choose the effect of text.
6.Combine the pictures and arrange them perfectly.
7.Save the file.
-THE END-
THANK YOU FOR YOUR ATTENTION


No comments:
Post a Comment