Sunday, April 17, 2011

WEEK 13 ( CASE STUDY 2 )

The Horrible DPI Mistake

 Firstly we should know, there are four main factors that determine image quality:
1) The quality of the recording device (camera's optics and sensor, scanner's  sensor).
2) The size (in pixels) of the digital image.
3) The digital format it is stored in (lossless vs lossy compression).
4) The technical proficiency and the "eye" of the photographer.

What Print Shops Really Mean by DPI

What they are really asking for is a photo that will print at a certain paper dimension in inches at 300 pixels per inch (PPI). If we remember from the Myth of DPI, the term DPI is a holdover from when this setting in a digital photo would set the paper output quality (resolution) of a printed image (number of printer dots per inch). This is no longer the case, but people still confuse DPI with PPI.


Let me explain first what is DPI and PPI.


DPI means paper printer Dots Per Inch while PPI means digital Pixels Per Inch. But in many instances the term DPI is used when in fact PPI is what is really meant. Even in these articles there is crossover of terms, since many software programs continue to use the legacy term DPI to mean PPI.
Back to our print shop - if they are looking for a digital photo to print at 10 inches by 8 inches, at 300 PPI, then they are really looking for a digital image with a resolution of 3000 pixels by 2400 pixels (regardless of the DPI setting of that image).


What Print Shops Really Need
 

The concept that 300 PPI = photographic quality is also a holdover from the quality of printing equipment a decade ago. Present day printers will output a good quality digital photo, with "photographic quality" at 200 PPI - so the requirements for a 10 inch by 8 inch paper photo become a good quality digital image with pixel dimensions of 2000 pixels by 1600 pixels.

A good quality digital photo is one:
  1. taken with a good quality digital camera (good optics and digital sensor)
  2. a photo that has not been enlarged either in post-processing or by in-camera digital zoom (never (ever) use digital zoom).
  3. a photo that has been properly shot (good lighting, no blur)
  4. a photo shot within the camera's ideal ISO range (usually a low ISO such as ISO 100)
  5. a photo that has been stored in either a lossless format (i.e. TIF) or a very low compressed JPEG (highest camera JPEG quality setting).
Such a photo will reproduce on paper at photographic quality (assuming current printing technology) at 200 PPI.


Solution : Changing the DPI


The trick when changing the DPI is to do it without resizing (resampling) our image in the process. We want to change the DPI while retaining the original pixel dimensions (the real digital resolution) of the photo. Here is and example to change the dpi using adobe photoshop.

Note that this procedure will not change the digital photo in any way other than to alter the internal DPI setting. The size and resolution of the digital image will be unchanged.


Adobe Photoshop is Used For Change The DPI


There are several steps in changing the DPI using adobe photoshop :
 
 
Step 1 :Load the image into Adobe Photoshop (or Photoshop Elements

Step 2 : Select the "Image > Image Size" menu option (may be "Image > Resize > 
              Image Size" in Photoshop Elements).

Step 3 : In the image size dialog window, deselect the "Resample Image" checkbox 
              (make sure there is no checkmark in that box).

Step 4 : In the "Resolution" box type in 300 (or whatever DPI we want)

Step 5 : Click the "OK" button

Step 6 : Our image DPI has now been set to whatever we want (leaving the pixel 
              dimensions of the image unchanged).

Step 7 : Save this photo with a new name -  suggest adding a -300dpi extender 
              (i.e. "345-2365-300dpi.jpg") to identify this new DPI image 


 note that the "Resample Image" box is UNCHECKED and that the "Resolution" has been set to 300


Saving to JPEG - please note that JPEG is a digital photo format that uses variable compression - that is, we can change the compression. Our camera should (if we have it set correctly) be using low compression (highest quality). To emulate this when doing a "save as" from a photo program, choose a compression of about 95 (Adobe Quality 10+).
 

Other photo programs are going to have a similar process. The key is to make sure that the image is not being resampled (pixel resized) when the DPI is changed. As long as the pixel dimensions remain unchanged, our new DPI photo will be identical to our original photo, only the internal DPI setting of the photo will have been changed. The  print shop, graphics designer or magazine should be happy campers with our "new higher DPI" image. 

WEEK 12 ( PRINTING)


A measurement of image resolution that defines the size an image will print. The higher the ppi value, the better quality print you will get--but only up to a point. 300ppi is generally considered the point of diminishing returns when it comes to ink jet printing of digital photos.


A measurement of printer resolution that defines how many dots of ink are placed on the page when the image is printed. Today's photo-quality ink jet printers have dpi resolution in the thousands (1200 to 4800 dpi) and will give you acceptable quality photo prints of images with 140-200 ppi resolution, and high quality prints of images with 200-300 ppi resolution.

  • Resolution is the measurement of how many dots/pixels fit into one inch.
  • The higher resolution the sharper images
  • Recommended resolution : 300 dpi for crisp and clear result.

If we are using lower image resolution, image will appear fuzzy, jagged and blurry. Unless if we are using glossary paper because it will give us reflection on our eyes.


In two situation if we are using

  a ) resolution = 400 dpi

   b) resolution = 72 dpi


The 400 dpi will give crisp image. It will be print smooth. While for the 72dpi it will make image will be fuzzy. This is will printing blur image.


Dpi is for printing. It does not matter to screen or web page if you store 72 dpi there, or 7 dpi there or even 7200 dpi there. It simply does not matter what it says there, because on the screen, that number is ignored. The original correct number is no better on the screen, it only affects printing, on paper, where inches exist.
 
Even Adobe has problem to understand that. Or they give us what we want, as when saved for the web, Photoshop automatically sets the resolution to 72dpi even if it is meaningless and has no effect in any way on the image or what you see. The numbers affects only the future printing resolution and size? My advise is that you take control yourself! The mythical "72" dpi was maybe fairly accurate once on a PC 14 inch 640x480 VGA display, but way off an 17 1280x1024 inch monitor which might have a resolution of 96dpi.


RULES TO REMEMBER

  • Image for printing should be 300dpi at the final size in layout.
  • Image which include text should be 400 dpi at the final size layout.
  • Resolution and image size are inversely proportional to each other.
  • Enlarge image, the resolution decreases 
  • Reduce the image the resolution increases
  • Taking the photo on the highest setting will maximize both the quality of image, as well as the range of sizes at which we will be able to use it in printing object.

PRINT SIZE

The maximum print size that a digital camera can produce is directly related to the number of pixel on the camera's ccd.


Convert pixels to inches (Output to Monitors/Printers)
Formula: Pixels ÷ DPI = Inches 


 If we know the pixel width and height of an image, this section will calculate the physical size (in inches) of the image when it is printed or displayed on various devices.

To use the calculator, enter the width and height, then select the output resolution which will be used.

* Most monitors display images at approximately 75DPI. To check your own monitor, use the chart below.

* Many printers use a process known as Image Refinement when processing images. This may impact the relation between input and output resolution. Generally, 300DPI is adequate for photo-like prints


Convert inches to Pixels (Input from Scanners)
Formula: Inches X DPI = Pixels


If the catalog will be printed on a 600 DPI printer, the item should be scanned with a resolution of 600 DPI, and care should be taken not to re-size or resample the intermediate image file before printing.
When the output destination is a computer screen, as in the case of auction photos, the scanned image may require further reduction using an image editor before the image is physically small enough to fit on the viewer's screen.

Scanners typically allow the DPI resolution to be adjusted via software. For best results, scanning should be done at the resolution of the intended output device.


Example: a book cover measuring 8 in. by 10 in. will produce an image height of 750 Pixels even when scanned at only 75 DPI. Because many computer displays are set at 800 X 600 Pixels, the resulting photo will be taller that the display area and force scrolling.


WEEK 16 ( FINAL EXAM)

gud luck semua kawan..semoga kita bejaya dpat jawab exam dengan jayanya 29.4.2011...hik2...dr zaida..saya nak A...hik3...tp  kalo dpt A+ pon ok gak tuh...kui3...

WEEK 15 ( PRESETATION AND JAMUAN)

This is last week for our class. This week I just sit in the class and looking  for my friends presentation.. Dan yang paling best adalah..kita orang ade jamuan minggu ni..heheh.best2..minggu makan2..


menu :  bihun goreng, mee goreng, kfc, makanan ringan dan air kotak,, tak lupa juga kek yg sedap..hik3...yeke?padahal saya rase sket jer..coz tersangat la manis,..xsuka makan manis2..hik3..

terima kasih dr zaida and terima kasih kawan2 semua...:)

WEEK 14 ( ASSIGNMENT 2 & 3 )

ASSIGNMENT 2 &  ASSIGNMENT 3

PREPARED BY : 
 NOOR HIDAYAH BINTI  CHE LAH  
MP101013
 
PREPARED FOR : 
ASSOC. PROF.DR. ZAIDATUN TASIR
 
ASSIGNMENT 2  
Digital Image Manipulation (6 Images)
 Image 1
                                                                  My picture
 

                                                              Tun Dr. Mahathir


Images 1 (techniques used) 
 
§Crop
§Blur
§Combination
         Steps : 
           1. Crop the picture of  Tun  Dr Mahathir using crop tool and select with  magnetic   lasso tool.
            2. Combine the picture to  my  picture.
            3. Crop the background picture.
            4. Make the blur background using blur  tool.
            5. Save the file.

Result for Image 1 

  
Image 2
  Picture a
 
  Picture b
 
   Picture c


Images 2 (techniques used) 

§Crop
§Combination
§Superimpose
§Rotate
§Resize
            Steps :
            1. Resize picture c to be small than others pictures.
            2. Crop pictures a and picture c using magnetic lass tool.
            3. Combine the pictures that had been crop to picture  b.
            4. Duplicate layer for picture c that had been crop to get superimpose picture.
            5. Rotate the duplicate layer  using edit-rota canvas-flip canvas vertical.
            6. Place the  duplicate layer picture to the  right position.
             7. Save the file.

Result for Image 2
  

 Image 3

  Picture  a 

  Picture  b

Images 3 (techniques used)
§Resize picture
§Pattern
§Hue Saturation
           Steps :
  1. Resize the picture a to become small.
  2. Define the pattern of picture b by using , open file-open picture b – select picture b-edit-define pattern-save the pattern.
  3. Open the picture a, select area that want to be   pattern using magnetic lasso tool.
  4. Then, click select, modify, feather, choose radius.
  5. Click to the select area, right click-fill-choose the pattern.
  6. For huge saturation, click image-image adjustment-huge saturation. Choose the color that wanted.
  7. Save the file. 
 
                                                                   Result for Image 3 


Image 4
  Picture  a 


Picture  b 

  
  Picture  c

Images 4 (techniques used)

§Combination
§Hue saturation
§Crop
§Black and white
§Resize
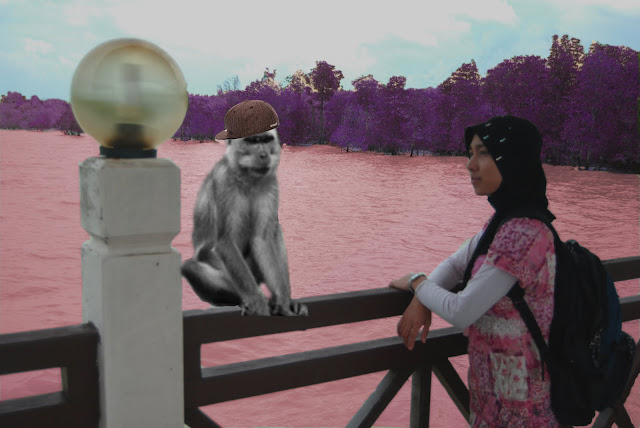
 Steps :
    1.  Resize picture c (cap) became smaller .
    2.  Crop picture b (monkey) and picture c (cap) using  crop tool and edit the pictures using magnetic tool for better view.
    3.  Combine the picture b and c that have been crop  at the pictures  a.
    4.  Select  the water using magnetic tools ,change the color using huge saturation. Select the tree using magnetic tool and  edit color using huge saturation.
    5.  Select monkey, then edit the color of monkey to be black and white. To do this, click image-adjustment-black and white.
    6.  Save the file.
      Result for Image 4


 Image 5

Images 5 (techniques used)
§Black and white
§Crop
§Filter (liquify)
 Steps :
 1.  Select the picture, change color of picture to be black and white. To do this, click image-adjustment-black and white.
 2.  Crop the right site of picture, filter it using liquify. Repeat the same thing for the  left site of picture.
 3.  Save the file.
Result for Image 5


  Image 6

  Picture  a

 
   Picture b

Images 5 (techniques used)
§Resize
§Combination
§Framing
§Crop
Steps :
 1.Resize picture a to become smaller.
 2.Crop picture a (subject need) using crop tool, select the subject using magnetic lasso tool.
 3.Combine the picture a that had been crop to picture b.
 4.Create framing at the pictures b. To do this, choose rectangle tool  and put it  as white color.Put it for the whole side of picture as a framing.

 Result for Image 6

ASSIGNMENT 3
 Graphic Design – Books Cover

Pictures used


Design of Book Cover

Description of Book Cover 
§Size : 6 x 8 inch
§Title : Landscape Photography
§Background color : white
§Theme : Simple and just nice
Description of Text Used
§Typography : Trebuchet MS

§Font size : 36  ( LANDSCAPE) &
                          48 (PHOTOGRAPHY)
§Text  color : Green

§Text effects :         - drop shadow
                                 - Outer glow
                                 - bevel and emboss
                   - contour
Steps:                               

1.Edit picture which is to add lighting effect using filter-render
    lighting effect.
2.Edit picture for   add blur using blur tool.
3.Edit picture for  crop using crop tool.
4.Resize  all of the pictures. Edit-image size-resize the image.
5.Create  a new layer and design the text. Double click to tex
    layer –layer style-choose the effect of text.
6.Combine the pictures and arrange them perfectly.
7.Save the file.

 
-THE END-
THANK    YOU  FOR  YOUR ATTENTION


WEEK 11 ( PATTERN AND HUE SATURATION)

 PATTERN

1. Open the picture that we are going to edit.


 2. Select the area that we are going to change the pattern. Select are with using magnetic 
     magic lasso tool.

3. After finish select, open the pattern we want to create.


4. Open the picture, define the pattern. select the pattern we want and then, click edit>define the   pattern, save the pattern. Re size the image if the image is too large.
5. Open the handbag picture and right click for the selected area just now, fill the pattern with the pattern that we created just now.

6. Save the file.

RESULT OF PATTERN


Another pictures that has been used pattern.


Picture want to pattern


Create a zebra pattern 


Result of using zebra pattern


HUE SATURATION


Steps :

1. Select the jacket using magnetic lasso tool

2. After completed select, click edit, adjustment and then choose hue saturation.

3. Edit the color that we want and also the brightness

4. Save the file.

Result of Hue Saturation


WEEK 10 (ADOBE PHOTOSHOP PRACTICAL MODULE)

Imej Combination


step 1 : edit this picture using icon rectangular marquee tool. Select the element that want to delete.

step 2 : edit image >canvas size

step 3 : by using icon rectangular marquee tool, select area of two character in the image

step 4 : use icon move tool to move the object to the right side.
step 5 : open this pictures

step 6 : use add to selection at option bar with press shift for make sure all the are is selected include the shadow

step 7 : when all the area is selected, used select > inverse, so that the main character will be select

step 8 : select > feather, choose radius to be 2 and then click ok

step 9 : use edit>copy and edit>paste by using ALT and icon move tool to move the pictures to the toystory.jpeng 


step 10 : open this file

step 11 : use icon lasso tool to select the character of shrek

step 12 : add to selection at option bar menu to add the area of selection

step 13 : after complected select, use feather to make selection is smoother

step 14 : used edit>copy and edit> paste, to toystory.jpg

step 15 : arrange the picture and add some text

step 16 : save the picture

Result of image combination


Application of using filter


step 1 : click filter>artiristic > coloured pencil

step 2 : control or adjust the pencil width and paper brigtness at the pop up window

step 3 : save the file


Result of application of using filter


Cloning


step 1 : click the clone stamp tool at toolbox and press ALT at the same time

step 2 : choose the size of brush and opacity

step 3 : put the icon  clone stamp tool at the people and press ALT at the people

step 4 : drag the mouse to the place that we want to clone

step 5 : repeat step 1 until 4 for clone the basket


Result of cloning


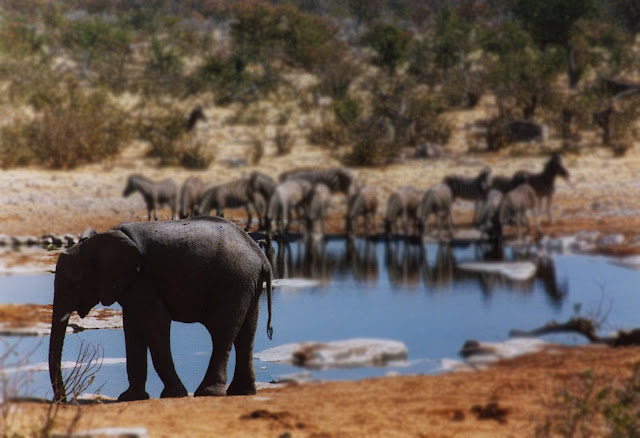
Blur tool (Bokeh)

step 1 : open image

step 2 : click on icon blur tool at toolbox

step 3: choose the brush size, mode and strength

step 4 : drag the mouse to the area that want to blur.

step 5 : make sure it only blur the background not the elephant.

step 6 : save the file

Result of image using blur tool